
Part of Photo to Cross Stitch Pattern, Step by Step
How to Read a Cross Stitch Pattern
To read a cross stitch pattern, treat each square on the grid as one cross stitch and look up its symbol in the key to find the thread. Count your place from the bold line every 10 squares, and start stitching at the centre, which small triangles on the edges mark.
Below is a real page from a Photostitch chart of a cat photo, 80 x 97 stitches and 20 colours, explained one part at a time.
What does each square and symbol mean?
Each square is one full cross stitch on one square of your fabric. The symbol inside tells you the colour, and the key turns that symbol into a thread number.
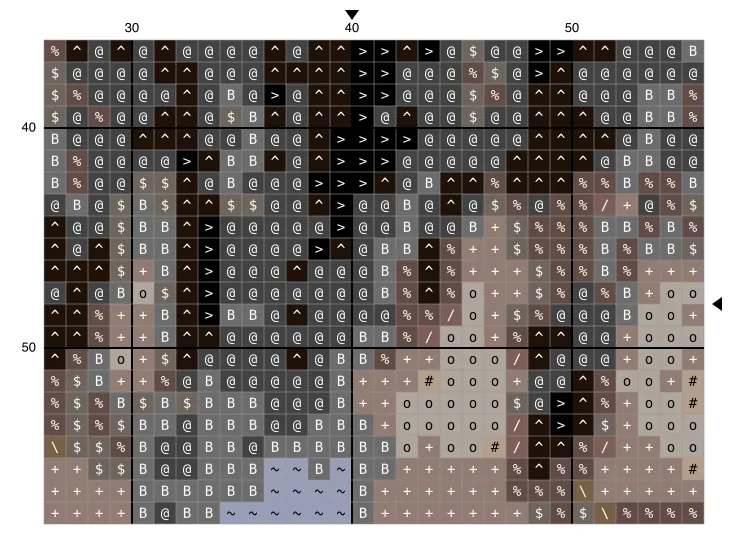
The squares are also shaded in the thread's colour, which helps you see shapes at a glance. Trust the symbol when two shades look alike, especially on a home printer.
| Symbol | Thread number | Colour name | Stitches in the whole chart |
|---|---|---|---|
| + | DMC 451 | Shell Gray Dark | 1501 |
| o | DMC 647 | Beaver Gray Medium | 671 |
| # | DMC 3032 | Mocha Brown Medium | 509 |
| @ | DMC 3799 | Pewter Gray Very Dark | 472 |
| % | DMC 779 | Cocoa Dark | 417 |
| / | DMC 3860 | Cocoa | 268 |
| \ | DMC 610 | Drab Brown Dark | 257 |
| > | DMC 310 | Black | 249 |
| ^ | DMC 3371 | Black Brown | 241 |
| ~ | DMC 160 | Gray Blue Medium | 201 |
| $ | DMC 645 | Beaver Gray Very Dark | 185 |
| B | DMC 317 | Pewter Gray | 143 |
What are the bold lines and numbers for?
The bold lines fall every 10 stitches, so you count from the nearest one instead of from the edge. The numbers along the top count columns and the numbers down the side count rows.
In the section above, the bold lines are columns 30, 40 and 50 and rows 40 and 50. A stitch three squares right of the 40 line is in column 43.
Many stitchers mark each 10 x 10 block on the printout as they finish it. It is the easiest way to keep your place when you come back to a project.
Where do I start stitching?
Start at the centre of the chart and the centre of your fabric. The triangle above the grid points to the centre column and the triangle beside it points to the centre row.
On this chart they point at column line 40 and row line 48, the middle of 80 columns and 97 rows. Fold your fabric in half both ways, and the crease lines meet at the same spot.
How do the pages of a big chart fit together?
A chart bigger than one page is split into blocks, each printed on its own page. Our PDFs fit up to 50 columns and 60 rows on a page, so the 80 x 97 cat chart takes 4 chart pages.
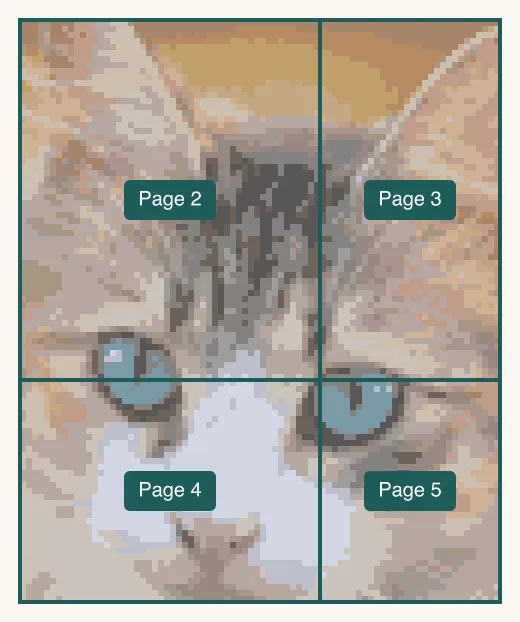
- Page 2: columns 1-50, rows 1-60.
- Page 3: columns 51-80, rows 1-60.
- Page 4: columns 1-50, rows 61-97.
- Page 5: columns 51-80, rows 61-97.
Each page header names its columns and rows, and the numbers on the grid keep counting across pages. Pages don't repeat any stitches, so line them up by those numbers.
What does the key tell me?
The key lists each symbol with its thread number, colour name, number of stitches and the skeins to buy. Read the note at the bottom too: ours says the skeins assume full stitches with 2 strands on the fabric count you chose.
For example, + is DMC 451 with 1501 stitches, which is 1 skein on 14-count. How we work that out is in how much embroidery floss you need.
Photostitch charts use full stitches only, so there are no backstitch lines or half-stitch symbols to decode. Other counted cross stitch patterns may draw backstitch as lines over the grid, and their key says which thread to use for them.
Can I make a chart like this from my own photo?
Yes. Our free cross stitch pattern maker turns a photo into a chart with the same grid, centre marks, page headers and key, ready to print.
For choosing the photo, width and colours first, read how to turn a photo into a cross stitch pattern.
Photo: Tabby cat with blue eyes by AdinaVoicu, released under the CC0 1.0 Universal Public Domain Dedication. We cropped it and charted it with Photostitch.

Chart your own photo
Next: read the full guide, Photo to Cross Stitch Pattern, Step by Step.